Learing to Eat
RSS
  • Home
  • About Us
  • Book
    • For Book Clubs
  • Events
  • Press
    • Radio
    • Reviews
  • Contact

Baking with Boys: The Grant Loaf

March 12, 2010 By caroline in Uncategorized Tags: baking, cooking with kids, recipes, vegetarian

by Caroline

Among the many cookbooks Ben owns, he’s currently drawn most to the beautifully photographed Cooking with Kids. It’s not quite as charming as Mollie Katzen’s Pretend Soup, nor as fun to read as Alice Waters’ Fanny at Chez Panisse, but it’s got a nice mix of simple (chocolate bananas) and more complicated recipes (cinnamon meringues) and I like that, unlike in some kids’ cookbooks, the recipes for pie start with a recipe for pie crust. Plus, it looks great, and there’s nothing better to draw a kid into a new cookbook than gorgeous pictures of food.

Ben has dogeared more than half the recipes but on a recent rainy day, it was Eli who felt like baking with me, and we couldn’t resist trying this recipe, named for a Doris Grant, who apparently invented the bread by accident. What accident? She forgot to proof the yeast, or knead the bread, or do any of the things one normally does to bread dough? It’s not explained, and while I was dubious, the unconventional method produced a perfectly nice loaf of bread.
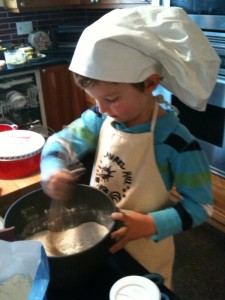
the baker

Butter one large or two small loaf pans (the recipe calls for a single 16x5x4″ pan, which is much bigger than mine so I used two 8×4″ pans)

Combine in a large bowl:
5 c whole wheat flour
1 t salt
1 envelope (2 1/2 t) active dry yeast

Stir together in a glass measuring cup:
1 T honey
2 1/2 c lukewarm water

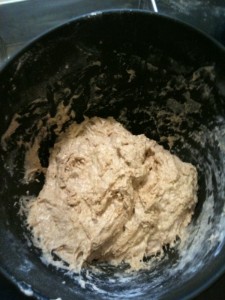
Make a well in the dry ingredients, and pour in the liquid. Stir well for a couple minutes until you have a nice dough.

dough

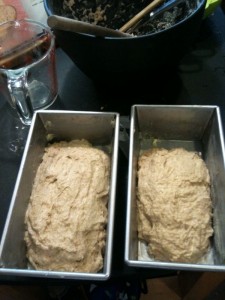
Put the dough in the prepared bread pan(s), smoothing the top a bit with a spatula.

you can see I'm not terribly precise about dividing the dough...

Let rise in a warm spot for 30-40 minutes, until the dough has risen to within about an inch of the top of the pan. While the bread is rising, heat the oven to 400.

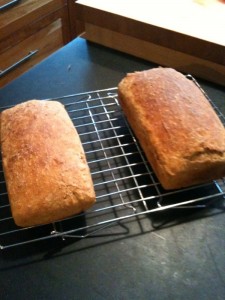
Bake for 35-40 minutes. Test for doneness by turning the loaf out of the pan and tapping the bottom: if it sounds hollow, like a drum, the loaf is done; if not, return the loaf to the pan and bake another 5-10 minutes.

This is the hardest part: let cool before slicing.

Cooking with Ben

March 11, 2010 By caroline in Uncategorized Tags: baking, cooking with kids, recipes, vegetarian

by Caroline

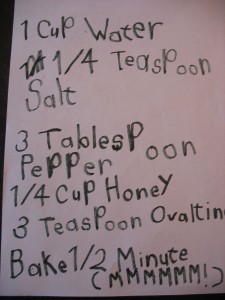
A recipe Ben wrote when he was 5 (we didn't make it)

I love Pete Wells’ Cooking with Dexter column, and this week’s installment spoke to me particularly. Wells, apparently, is a perfectionist, and his occasional cooking missteps make him storm and stomp – unless his five year-old son is around. Then, because like any parent Wells likes to model more constructive behavior, he checks his temper and tries to let the mistakes slide off his back.

The article resonated with me not so much because I’m like Wells but because my son Ben is like Dexter – a boy who will erase a mistake so hard that he wears a hole in the paper — and the note Dexter wrote to himself after a painting went awry breaks my heart: “Step 1: Do your best! Step 2: Try again.”

But Dexter goes for it in the kitchen, and so did Ben at the same age. Wells writes, “When Dexter is at the stove, neither failure nor success surprises him. Watch him bake: he freestyles like a snowboarder.” And amazingly, it works. He wings it, and most of the time it turns out okay.

Ben’s never entirely freestyled – he loves the mathematical precision of baking’s measurements too much to abandon them entirely – but when he was five and a daily reader of cookbooks (he asked for cookbooks as his bedtime stories) he absorbed them so thoroughly he started to write his own. Here’s another recipe Ben wrote when he was five (with my comments in brackets):

Whole-Wheat Bread

You’ll Need
¾ c + ½ c whole-wheat flour
½ c warm water
1/3 c cornmeal
1 package (1/4 ounce) dry yeast
3 tablespoons + ½ teaspoon granulated sugar
½ teaspoon salt
1 ½ teaspoons baking soda
2 tablespoons + ¼ teaspoons wheat germ
¼ teaspoon baking powder
2 sticks (1 cup) unsalted butter [I talked Ben down from a full cup of butter, so we used 1/2 cup, melted]

Equipment
Measuring cups & spoons
Bread pan
Cooling rack

Preheat oven to 375 F.
Measure the flour, cornmeal & butter into the bread pan
Add the yeast and salt
Now add the water, sugar, baking soda & baking powder
Add the wheat germ
Bake up to ½ hour [it took exactly half an hour. This surprised me almost more than how good the bread tasted]

Note: This bread will taste good with some raspberry jam (page 77) [a reference to the jam recipe still to come in his hypothetical cookbook]

We ultimately halved the recipe (which delighted my fraction-loving boy) so a full recipe might need to bake longer than half an hour. Bake until the top is browned and a tester comes out clean. And it tastes alright, kind of like an especially crunchy soda bread.
(I wrote more about this baking experiment here).

Now that he’s eight, Ben is less inclined to freestyle and more likely to follow recipes to the letter. He made his own birthday cake this year, choosing to follow a recipe in a kids’ cookbook that I don’t much like. I resisted the impulse to alter the recipe as he went, though, in favor of his getting direct experience with the recipes and letting him judge for himself. And really, although I could quibble about a few things, the cake tasted fine and — more importantly – the boy made his own cake!

Ultimately, I hope, there’ll come a day when both my kids achieve a good balance in the kitchen: sometimes using cookbooks as inspiration for something new, sometimes following their recipes to the letter, always getting plenty of experience so that they can find ways to salvage the experiments that go awry, without deflating like a couple of soufflés.

Social Shopping

March 5, 2010 By caroline in Uncategorized Tags: marketing, produce, unfamiliar food

by Caroline

I love peeking in other people’s shopping bags and baskets. The other day a fellow Trader Joe’s shopper snagged my cart by accident and as I wheeled hers up and down the aisles, I marveled at what different groceries she found — it was as if we were shopping in different stores — but after I retrieved my cart, I paused at the cookie aisle to pick up a box of the maple leaf cream sandwiches I’d seen in hers.

At the grocery store, I like to imagine what’s on a fellow shopper’s menu based on what I see go down the conveyor belt ahead of my purchases. Recently, it was 4 white onions, a can of frozen limeade, and a bag of ice. Um, onion tart and margaritas? One can only hope. For me, the grocery store is more for last minute pick-ups than the big weekly shop, so I wind up with random assortments like this:

That’s a basket that says I’m really hungry (sushi & mojo bar), Eli is hungry and I’m too hungry myself to maintain high standards (Annie’s canned spaghetti-Os); but I have Ben on my mind, too: there’s a birthday cake to decorate (milk chocolate for the frosting; candles; colored sugar sprinkles); and I’m wondering if he might like adzuki beans better than cannellini (I’m trying to up his iron intake) so I grab a can rather than invest the time in dried.

But nobody asked me about my basket, because at the grocery store, it seems, that’s unseemly. Is it because at the grocery store we’re more likely to buy packaged foods — dump and heat things — rather than items we actually cook? Or is that just me? Maybe it’s just the atmosphere of the store which makes it a place folks don’t typically chat about their choices.

Regardless, it’s one more reason why I love shopping at the farmer’s market. Here, we’re all buying fresh ingredients, and both the other shoppers and the farmers are happy to share ideas about what to do with them. Don’t know how to prepare agretti? Ask the guy who’s buying a pound! We ate broccolini recently, and the boys studied the buds closely, unable to remember what a broccoli flower looks like. At the Sunday market, one of the farmers had both flowering broccolini and flowering arugula, which I’d never seen. What to do with them? Saute the first, salad the second, said the nice farmer from Marin Roots. So I bought bunches of each and the boys nibbled on the flowers like little goats. The verdict? thumbs up on the flowering broc, but the arugula flowers, while tasty in my salad, were too spicy for the boys’ taste. This time of year, the farmers are starting to pile up all sorts of new greens on their tables, and if you ask me, it’s fun to share what we’re doing with them.

Sunion Tart

March 4, 2010 By lisa in Uncategorized Tags: baking, cooking with kids, family dinner, plissadiere, Sunion Tart

by Lisa
Be warned:  This is delicious, but not fast. It’s fun, but time consuming. It’s really pretty, but a major commitment of energy. Also, the kids might not eat it. Still.

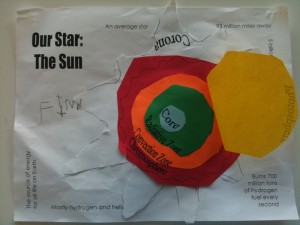
A  few weeks ago, Finn and I went to Chabot Space and Science Center for  a kid’s science class about the sun. It was full of fun, hands-on projects, including something called a “Sunion”–a layered collage demonstrating the Sun’s layers.  This was new information to him, and he took much care cutting and arranging the layers.  When he proudly told his sister about it (“I made a Sunion!” ) she exclaimed, “A Sunion?  What’s  a Sunion? That sounds like a pie!” Which of course it does. It sounds like a pissaladiere–a really delicious, melt in your mouth savory French tart made with onions, garlic, anchovies, and black olives. So of course, yours truly followed through.

Together, we brainstormed what foods might make the various layers of the sun, and adapted the pissaladiere to Finn’s diagram. The result was really delicious, though Finn wouldn’t touch it, of course.

Here is Finn’s Sunion:

Yellow photosphere lifts to reveal:  blue core, green radiative zone, orange convection zone, red chromosphere, white corona

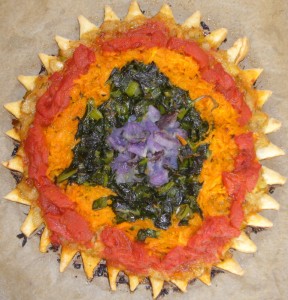
Here is the one we ate:

The layers are composed of

  • purple peruvian potatoes (boiled, cubed, tossed with butter)
  • erbette chard sauteed in butter and olive oil with minced onion
  • carrots sauteed in butter with thyme
  • chopped plum tomatoes simmered with butter and thyme,
  • all layered over a bottom layer of sliced yellow onions carmelized with 2-3 cloves garlic and 2 anchovies.

Once the vegetables are cooked, layer them over the uncooked pie crust according to your five-year old’s directions. Or you can improvise.

I would have added black olives for sun spots if I had any in the house. Also, I used a frozen TJ pie crust, which are terrific in a pinch.  I rolled out the crust and cut the sun spokes with a paring knife, but you could obviously skip this and use a tart pan or even a plain old pie plate, or just free form it…

The hard part is that each layer needs to be cooked separately and drained so it doesn’t make the crust soggy. Once the tart is assembled, it goes in a hot (375 degree) oven until the crust is cooked.  You can eat it immediately, or serve at room temperature. If you have the time and inclination, it would make a great side dish for company, a terrific plate on an al fresco buffet, a nice anchor for a picnic lunch…

Pan Roasted Chicken

March 2, 2010 By lisa in Uncategorized Tags: family dinner, fast, fast chicken, Pan Roasted Chicken

by Lisa

This is one of the easiest & fastest ways to prepare chicken in the winter, and it has the added virtue of being really adaptable.  It’s not a recipe, but a technique, so you can use whatever cuts of chicken your family likes best, whatever fresh or dried herbs you prefer, and add a few root vegetables, or not.  It’s also virtually fool proof-the technique makes it pretty much impossible to dry out the chicken.  You can serve it with rice, made in your rice cooker, or baked potatoes, or just some good fresh bread, and a side salad, or if you’re feeling ambitious, a simple sautee of greens or steamed broccoli.  For a busy family, this dinner is a godsend.

The Ingredients:

  • Olive oil
  • Bone-in chicken parts: legs, thighs, breasts, or a combination–enough to feed your family
  • 2-3 springs fresh thyme, rosemary, oregano, or a combination, or a teaspoon or so dried
  • 1/2 cup white wine or chicken broth
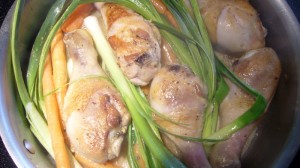
  • Optional:  whole, unpeeled garlic cloves; carrots, sliced in half lengthwise; whole baby leeks or green onions; quartered onions; 2-3 canned plum tomatoes….be imaginative, use what you have…
  • Equipment: heavy bottomed, oven proof sauce or saute pan w/lid

The Technique:

Preheat the oven to 350 degrees.

On the stove, brown the chicken in a couple of tablespoons of olive oil. The parts won’t be cooked through–you just want them to acquire a nice, rich color.

Deglaze the pan with the white wine or broth, scraping up all the bits that cling to the bottom. Simmer until most, but not all of the liquid is evaporated. You’ll want about 1/4 cup of liquid to remain in the pan.

Add your herbs and any vegetables (or not) you are choosing to add.

COVER the pan and set it in the oven to finish cooking.  Depending on the size of your parts, this will take about 20-25 minutes.  The chicken cooks pretty quickly, so make sure any vegetables are chopped small enough to finish cooking in that time.  The roast should produce a lovely, rich sauce, which you can spoon over the chicken and/or rice.

«‹ 89 90 91 92›»

Recent Posts

  • Vegan Chocolate Brownies
  • Polenta with Decadent Mushrooms
  • Tortillas
  • Food & Farm Film Fest!

Now Available

About Us

  • Caroline M. Grant
  • Lisa Catherine Harper

Archives

Tags

appetizers baking book reviews breakfast cassoulet book celebrations chocolate comfort food contributors contributor spotlight cookies cooking with kids Dad's cooking dessert dinner Drinks eating out family dinner farms and farming fast fast food fish fruit gardening with kids holidays ice cream junk food less meat lunch marketing new food Parties picky eaters produce recipes restaurants road food salad sickness snacks sweets travel unfamiliar food vegetables vegetarian
Learning to Eat
© Learning to Eat 2025
Powered by WordPress • Themify WordPress Themes

↑ Back to top