Learing to Eat
RSS
  • Home
  • About Us
  • Book
    • For Book Clubs
  • Events
  • Press
    • Radio
    • Reviews
  • Contact

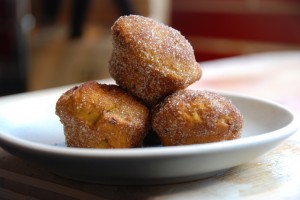
Doughnut Muffins

December 1, 2010 By caroline in Uncategorized Tags: baking, comfort food, holidays, recipes, snacks, sweets, vegetarian

by Caroline

This time of year, seasonal eating is often also holiday eating, as we slide from Halloween through Thanksgiving into Christmas and New Year’s. I want to take each of these in turn, give them their due, and then take a breath before the next one is upon us.

Which is why I love Advent. The liturgical calendar I’ve followed my whole life gives us four weeks of contemplative preparation for Christmas, four weeks of lessons and carols and calm. But, sadly, no specific Advent foods. Advent’s a quiet period, not quite as abstemious as Lent, but still not a big feasting time. And this year, when its first week overlaps with Hanukkah and my boys are coming home from school talking about dreidels and menorahs, it’s been a little hard to keep them focused on our traditions. And who wants to compete with latkes, anyway?

But I think I have hit on the perfect Hanukkahvent (or perhaps Adventukkah) snack: the doughnut muffin. A bath in melted butter and cinnamon sugar gives it the fried crispiness of a latke, but it is baked — not fried — to suit the more temperate Christian holiday. Compromise never tasted so good.

Pumpkin Doughnut Muffins

10 tablespoons (1 1/4 sticks) unsalted butter, room temperature, plus more for pan
3 cups all-purpose flour (spooned and leveled), plus more for pan
2 1/2 teaspoons baking powder
1/4 teaspoon baking soda
1 teaspoon coarse salt
1/2 teaspoon ground nutmeg
1/4 teaspoon ground allspice
1/3 cup buttermilk
1 1/4 cups pure pumpkin puree
3/4 cup light brown sugar
2 large eggs

For the Sugar Coating
3/4 cup granulated sugar
2 1/2 teaspoons ground cinnamon
1/4 cup (1/2 stick) unsalted butter, melted

Preheat oven to 350 degrees. Butter and flour 12 standard muffin cups, or line them with paper liners.

In a medium bowl, whisk together flour, baking powder, baking soda, salt, nutmeg, and allspice. In a small bowl, whisk together buttermilk and pumpkin puree. In a large bowl, using an electric mixer, beat butter and brown sugar until light and fluffy. Beat in eggs, one at a time, scraping down bowl as needed. With mixer on low, add flour mixture in three additions, alternating with two additions pumpkin mixture, and beat to combine.

Spoon 1/3 cup batter into each muffin cup and bake until a toothpick inserted in center of a muffin comes out clean, 30 minutes.

Meanwhile, in a medium bowl, combine granulated sugar and cinnamon.

Let muffins cool 10 minutes in pan on a wire rack. Working with one at a time, remove muffins from pan, brush all over with butter, then toss to coat in sugar mixture. Let muffins cool completely on a wire rack. (Store in an airtight container, up to 1 day.)

recipe from Martha Stewart, Everyday Food

Ham with country mustard pan sauce

November 30, 2010 By lisa in Uncategorized Tags: dinner, family dinner, fast, ham, ham steak, Ham with mustard sauce

by Lisa

Most of us have experienced this moment: You set the plate of food on the table. The kids eye glare at it with disdain.  They groan, or turn up their noses, or pretend-barf. They say, “I’m not a (fish/meat/chicken/potato) person” or “That smells bad” or “What’s that?” (meaning, how in the hell did you ever think to cook that disgusting mess of so-called food?).

This happened at my table the the other night, in reaction to something I’ve cooked many times–a simple ham steak with a really quick country mustard sauce.

I said, “Fine, you don’t have to eat it.” But I asked them to try.  And this has been my attitude of late:  I let them choose what to eat.  So far, they haven’t gone hungry.

On this particular night, my son braved the food first. “Huh,” he said.   “It tastes better than it looks”

That was all the encouragement his sister needed, who agreed with him about the taste.  I didn’t think it looked particularly bad, but I suspect it was the grain of the mustard that looked weird to them

I’m not really sure exactly what I’ve done to get my kids to be moderately brave about food. Certainly, some of it is how their wired, but I suspect some of it is habit and expectation.  Certainly, it works in my favor that they like and trust each other. If one likes something, the other is more willing to try. I set things in front of them over and over and over again. I don’t argue or pander, but I give them a range of good choices.  I never force them to eat, but I do ask them to try small bites of new food.  Seasonal eating helps too–they expect certain things at certain times of year, and while there is sometimes a re-acclimation period (witness the ham, which I never cook in the summer), their memory is downright Proustian.

This ham is one of those fast weeknight dinners that I don’t cook too often, but it’s so easy, that probably I should.

Ham with Country Mustard Pan Sauce

  • Ham steak
  • Olive oil
  • Shallot, chopped finely
  • Country Mustard
  • Beer–a lager or light ale works well
  • Apple cider  or apple juice or water
  • Butter
  1. Fry the ham steak in a large skillet until warmed through, just a few minutes on each side.
  2. Sautee the shallot in a few tablespoons of olive oil until soft.
  3. Deglaze your pan with a few splashes of beer.
  4. Swirl in about 1 Tablespoon of mustard
  5. Add about 1/4 cup of cider, juice or water. The cider or juice will make it sweeter, but water works too.
  6. Simmer until the pan sauce reduced to about a 1/4 cup. Taste and adjust seasoning.
  7. Add in 1 T butter (optional).
  8. Return ham to the pan and simmer to warm through.
  9. Serve family style, with sauce.

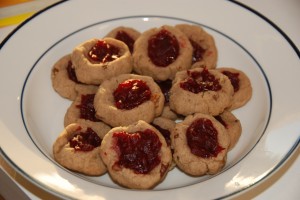
Cranberry Thumbprint Cookies

November 29, 2010 By caroline in Uncategorized Tags: baking, cookies, recipes, sweets, vegetarian

by Caroline

Using up the Thanksgiving leftovers is never a problem in our house. Maybe it’s because we’re typically only cooking for five, not fifteen or twenty as some of our friends. Or maybe it’s because we only cook things we really love — there are no obligatory platters of mashed turnips, just because Aunt Sally insists on them. So no matter the reason, our post-Thanksgiving ritual is not finding ways to get through that last bit of stuffing but, more typically, exclaiming with happiness about our Friday lunch plates of stuffing, gravy, cranberry sauce and caramelized pearl onions, and wondering why we don’t make these dishes more often.

An added wrinkle this year was the fact that Ben had spotted this recipe in a recent issue of Sunset magazine and became consumed with the idea of using our leftover cranberry sauce in cookies. We didn’t have any leftover cranberry sauce (partly because he eats it by the cup), but for him, I made an extra batch. The cookies are well worth it: a wonderful not-too-sweet shortbread, with a great tang from the cranberries. If you avoid nuts, just leave them out and the cookies will still taste great. I think these’ll become a regular part of our holiday cookie repertoire.

Sunset Magazine’s Cranberry Thumbprint Cookies

* About 2/3 cup cranberry sauce, drained
* 1 cup unsalted butter
* 3/4 cup packed light brown sugar
* 1 teaspoon vanilla extract
* 2 1/2 cups flour
* 3/4 teaspoon ground cinnamon
* 3/4 teaspoon ground allspice
* Pinch of salt
* 3/4 cup pecan pieces

Preparation

1. Heat oven to 350°. Whirl sauce in a food processor until smooth, about 30 seconds; set aside.

2. Beat butter and sugar together in the bowl of a standing mixer until smooth. Stir in vanilla extract. Add flour, spices, and salt, then mix on low speed until blended, scraping inside of bowl as needed. Stir in pecans.

3. Form dough into 1 1/2-in balls and set 1 in. apart on a greased baking sheet. Use your thumb to press a well into center of each cookie. Spoon about 3/4 tsp. cranberry sauce into each well.

4. Bake cookies until light golden brown, 12 to 15 minutes. Let cool completely on baking sheet.

Thankful

November 26, 2010 By caroline in Uncategorized Tags: Dad's cooking, dinner, family dinner, holidays, vegetables, vegetarian

by Caroline

Wednesday afternoon, after lunch. We’re hanging out, starting to think about, maybe, some Thanksgiving dinner prep. My brother-in-law calls; he’s on his way, but can’t stay as long as he expected. He’ll leave after lunch on Thursday, instead of staying through dinner.

Hmm. Thanksgiving dinner is always, in our family, in the evening: at dinner time. But we have been planning to share the meal with the boys’ West Coast Uncle Fun. We briefly consider a midday Thanksgiving meal, but that’s just never been our style. Special meals should be in the evening, with candlelight. Plus, we don’t want him to have to eat and run. It is after 1 PM. Could we get Thanksgiving dinner on the table in just five or six hours? We take on the challenge.

And so I am thankful. Thankful for the friend who loaned us her son for the afternoon so our boys were happily occupied (she thought we were doing her a favor, babysitting so she could care for her stomach flu-y daughter. I’ll keep letting her think that.)

Thankful for my mom, from whom I learned how to make brown & serve rolls, which are always ready when I need them, and who taught me to keep a light touch on the pie crust.

Thankful for my sister, who posts favorite recipes on her blog (like I do) so that we could easily produce her delicious cranberry chutney.

Thankful that no one wanted turkey. This year, after experiments with stuffed mushrooms (very good), polenta-topped roasted vegetable pot pie (excellent) and even lentil-mushroom timbales (meh), we’ve even decided to dispense with the notion of a “main.” All any of us really wants, when we get right down to it, is stuffing, gravy and cranberry sauce. Plus of course rolls and pie. I insist on something green (you should see my son put away the kale salad). And then we make various other things to put under the gravy. It’s a lot of chopping, but nothing needs the oven for four or five hours like a turkey does. The pans of pie, vegetables, and rolls, go in and out of the oven all afternoon.

Thankful for my brothers and my dad, siblings-in-law, niece and nephew, none of whom had much to do with this particular meal, but always figure in my thinking about food, family, and celebrations. I’m looking forward to our next big feast together!

And most of all, thankful for my husband, who has no problem cooking any meal, any time, but really kicked it into gear Wednesday to produce Thanksgiving dinner a day early. He started our in-no-particular-order to do list to make sure we got everything onto the table:

We sat down to dinner at 6:30, at a table decorated with Eli’s flower arrangement, and — so happy to have the meal on the table and my family gathered round — I did not think to take a picture of the spread. But trust me when I say it was delicious, and I hope yours was, too.

Brown & Serve Wheat Germ Rolls

November 24, 2010 By caroline in Uncategorized Tags: baking, recipes, vegetarian

by Caroline

When I asked Eli what he wanted to contribute to his kindergarten class “Family Traditions Feast,” he did not hesitate: “Rolls,” he said. “Grandma’s rolls.” And although on such a busy week, I might have wanted him to choose something less time-consuming (like his dad’s adaptation of his great grandmother’s lemon & parsley stuffing), I also couldn’t argue with him. These rolls, more than pumpkin pie or cranberry sauce, say Thanksgiving to me, and I make them every year. Now you can, too.

I’m giving the recipe essentially as my mom wrote it out for me years ago, with some additional notes about rising. Don’t be daunted by the length of the recipe; that’s just me taking time to explain how very flexible it is. If you plan ahead and it suits your personality, you can spend a little time with the dough over the course of several days before you have rolls; but you can also get the rolls completely finished in under 6 hours (of which maybe an hour requires your effort).

Brown & Serve Wheat Germ Rolls

Combine in a glass measuring cup:
1 cup/240ml warm (105º) water
2 envelopes/14g yeast

Let stand 5 – 10 minutes.

Meanwhile, combine in a very large bowl:

½ cup/113g butter
2 cups/490g warm milk
¼ cup/50g sugar (white or brown)
1 tablespoon/17g salt

and stir until the butter is melted, and the liquid has cooled slightly.

Add to the butter mixture and beat until thoroughly combined:
the yeast mixture
1 lightly beaten egg OR 3 T aquafaba OR 1T ground flaxseed + 3T water
6 cups/750g all purpose flour
1 cup/83g wheat germ

Turn out onto a well-floured surface, and knead a minimum of 10 minutes, adding up to 3 cups/380g additional flour to make a smooth dough.

Let the dough rest a minute while you wash out the mixing bowl and coat it with butter. Place the dough in the bowl, turning the dough to cover it thoroughly. Cover loosely with plastic wrap and a towel and let rise until doubled in bulk. If you let the dough rise at room temperature, this will take about 1 ½ hours. If you need a break from the dough, you could also stick it into the fridge to rise slowly overnight. When you’re ready to resume, take the dough out of the fridge and let it come to room temperature (allow an hour or two) before punching the dough down and carrying on.

After you’ve punched down the dough, let it rise a second time, covering as before, until doubled. At room temperature, allow 45 minutes to 1 hour; again, you could also do this second rise in the fridge overnight, letting the dough come to room temperature before continuing.

Punch the dough down and shape as desired: You can roll the dough out and cut it into circles, folding the circles in half to make the classic Parker House rolls. You can form balls of dough which you bake in a round cake or pie pan. You can make cloverleaf rolls by putting three small balls into each cup of a muffin pan. Or you can pull the circles into oblongs for finger rolls. However you shape them, give the rolls an inch or so of space between each other as they will expand as they rise and as they bake. Brush the tops with a bit of melted butter, cover with plastic wrap and a towel, and let rise until doubled:30-45 minutes at room temperature, or overnight in the fridge.

For brown and serve rolls:
Bake in a pre-heated 275º oven for 40 minutes. Leave in the pans 20 minutes, and then turn out to finish cooling at room temperature. When thoroughly cool, wrap well in plastic or ziplocs. Store in the refrigerator one week or in the freezer up to 3 months.

When ready to serve, thaw if frozen (leaving them overnight in the fridge works); then place on an ungreased baking sheet. Bake at 400º until brown, 7-15 minutes, depending on their size.

If, after the shaped rolls have risen, you want to bake them to eat right away, preheat the oven to 375º and then bake until brown, 20-30 minutes, depending on their size.

«‹ 70 71 72 73›»

Recent Posts

  • Vegan Chocolate Brownies
  • Polenta with Decadent Mushrooms
  • Tortillas
  • Food & Farm Film Fest!

Now Available

About Us

  • Caroline M. Grant
  • Lisa Catherine Harper

Archives

Tags

appetizers baking book reviews breakfast cassoulet book celebrations chocolate comfort food contributors contributor spotlight cookies cooking with kids Dad's cooking dessert dinner Drinks eating out family dinner farms and farming fast fast food fish fruit gardening with kids holidays ice cream junk food less meat lunch marketing new food Parties picky eaters produce recipes restaurants road food salad sickness snacks sweets travel unfamiliar food vegetables vegetarian
Learning to Eat
© Learning to Eat 2025
Powered by WordPress • Themify WordPress Themes

↑ Back to top